Monday 19 December 2011

A Wonderful Herbal Oil


Herbal Oil
 This oil is made by cooking herbs in a mixture of oils. It is for external use only. It can be used for pain in any body part, swelling, joint pains, and also is beneficial in congestion and acute cough and cold when massaged after warming the oil.
The amounts of blessing and good wishes I have got because of this oil are insurmountable. First I made it for my mother who is 78yrs. Old and suffers from joint and leg pain. All marketed oil proved to be not so effective, thus I came with the idea of making oil from herbs available most easily. My mom had immediate relief after that I have lost the count of people I have given this oil. I and my husband use it regularly. Many have learnt to make this oil from me and this encouraged me to blog the procedure to make this oil for the benefit of all those who read my blog and wish to be benefited by it.
This herbal oil is very good for people suffering with Arthritis.

      Preparation Time 30min.
      Making Time  2hrs.
      Makes 500 ml. oil.(will last for at least for 3-4 months for 4 people when used on regular basis).

       Materials Required for Making The Oil:-
  • 150 ml. Coconut oil
  • 150ml. Sesame seed oil (Til oil)
  • 150ml.Mustard seed oil (sarson oil)
  • 100ml.Olive oil
  •  15 – 20 Leaves or Castor (Arandi ke patte)
Castor(Arandi) Leaves
  • 25 – 30 Neem Leaves
Neem Leaves
  • 20 – 25 Basil Leaves (Tulsi Ke Patte)

Basil(Tulsi) Leaves
  • 50 gm. Caraway Seeds (Ajwain)
Carawar(Ajwain) Seeds
  • 50gm. Methi Seeds
Methi Seeds
  • 50gm. Garlic
  • 50gm. Ginger
  • 4 – 5 cloves
  • 4cm. stick of Cinnamon

      Directions For Preparing Herbal Oil: -
  • Clean all the leaves in running water.
  • Grind all the leaves in a grinder to a fine paste. (All leaves (castor, basil and neem) can be ground together).
  • Squeeze the green juice from the paste by passing it through a fine cloth (muslin cloth).
Extract of all herbs
    • Put some more water to the remaining solid left after squeezing the juice and grind again.
    • Squeeze so as all green color juice comes out.
    • Mix all the juice and keep aside.
    • Throw the solid left after squeezing the green juices of leaves.
    Solid to be discarded  after squeezing the green juice of leaves
      • Peel and cut Garlic to small pieces.
      • Wash and grate ginger.
      • Break the cinnamon stick to small pieces.
      • Take a big thick bottom wok and put coconut oil, mustard oil, sesame oil, olive oil, green juices of leaves, caraway seeds, and methi seeds, finely cut garlic, grated ginger, cloves and pieces of cinnamon.
      • Keep the wok with all the ingredients on high flame on the gas and cook with regular stirring.
      • After 15 – 20min. the liquid content of juices will start boiling, lower the flame and cook on low flame with regular stirring.
      Oil mixture and herbs mixed and being cooked
      • The color of oil will turn green and the liquid of juices will start evaporating.
      Solid started becoming dark in color and dry
      Oil made and to be cooled before being filtered
      •   Keep cooking on low flame till all liquid of juices evaporates and only solid is left at the bottom of the wok.
      Stage when only solid along with the oil is left.
        • Remove it from gas and allow it to cool.
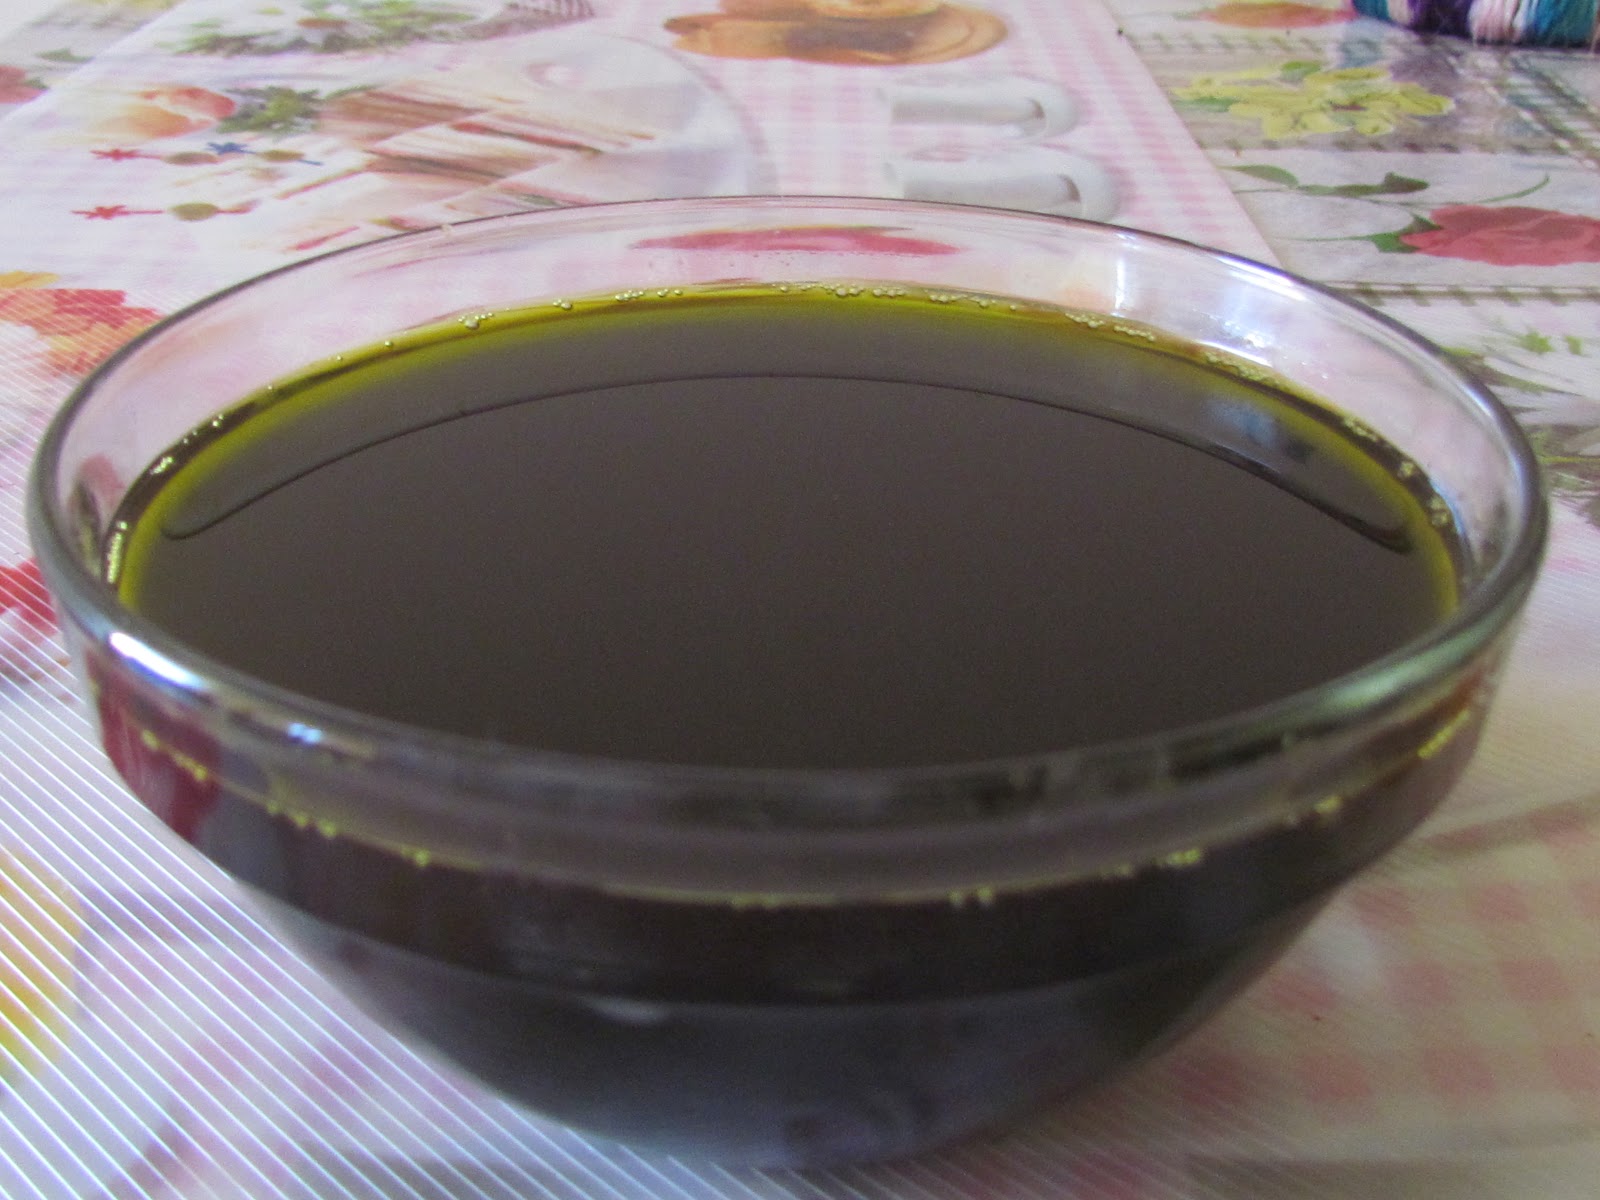
          Oil ready to be filtered and bottled
          • When the oil is cold pass it through a fine sieve or muslin cloth.
          Solid left after herbal oil is made to be discarded
          • Squeeze out as much oil as possible for much time and hard work has gone in making it. 
          Herbal oil filtered and ready to be bottled
          •  Store the oil in a glass bottle (you may use plastic bottle if glass one is not available but no metal container please).
          •      This oil can be mixed with mustard oil, olive oil or coconut oil for body massage. It relieves all tiredness  and pain.
          •     This oil is very good for those house hold where there are small children who eternally keep on falling and with old family members who suffer form joint and body pain invariably.
               HAVE A HAPPY PAINLESS LIFE.:-):-)

               TIPS:
          •   Do not cover the container in which oil is being made in any stage of cooking or cooling.
          • DO not take out the juice in a day or so in advance as the juice will lose its effectiveness if stored, it has to be used fresh for making oil.
          • DO not heat the oil and then put the rest of the materials as this will cause the essential oils which have got the therapeutic value to evaporate and the oil will not come out to be much effective.
          • Once the liquid of the juice of leaves starts boiling then cooking should be done in LOW FLAME.
          • Once all water from juices of leaves evaporates and only green oil and solid is left at the bottom remove from heat IMMEDIATELY.
            Suggested Variation:
          • If mustard seed oil and sesame seed oil are not available they can be replaced by olive oil or any oil of your choice.

          Monday 31 October 2011

          Tips For Mothers With Small Children.

             Often young mothers are heard complaining that the little ones do not like eating vegetables. Well first of all cook all type of vegetables at home even if you do not have a taste for them, and eat along with the children. As they say good habits are inculcated right in the childhood. 
          Apart from this there are few tips which may be helpful.
          • If your child has a dislike for Spinach/ Methi /Carrot then :-
              • Grate the carrot/ Cut the washed spinach/ methi
              • Add to whole wheat flour.
          Carrot, flour,ajwain (caraway seeds) and salt for dough
              • Add salt to taste, and 1 tea spoon of caraway seeds.(ajwain).
              • Make dough from it.
              • Make parathas out of the dough 
          Dough for paratha
              • Serve hot with tangy / sweet pickle / chutney/ sauce.
          Palak paratha and carrot paratha
              • Keep it in the lunch box with pickle or chutney
          http://jyotsna-pant.blogspot.in/search?q=Tomato+Pickle
          http://jyotsna-pant.blogspot.com/2012/06/tangy-mango-pickle-maharashra-style.html
          http://jyotsna-pant.blogspot.com/2012/06/mango-pickle-north-indian-style.html
          http://jyotsna-pant.blogspot.com/2011/10/green-coriander-and-mint-chutney.html
          http://jyotsna-pant.blogspot.com/2012/06/hariyali-chutney-raw-mango-chutney.html
          http://jyotsna-pant.blogspot.com/2012/06/spicy-mixed-vegetable-pickle-less-oily.html
            They will love the colorful parathas and also develop the taste of the vegetable.
            • Bottle guard (Lauki) is one vegetable very few children like. You are lucky if your children like its vegetable!
                • But in summers bottle gourd provides with much needed nutrition and its juice is very cooling to our system. So what to do?
                • Simply take a soft Lauki wash it.
                •  Grate the required amount, add ajwain (caraway seeds ), salt, chopped coriander leaves, and besan and make loose dough.
                •   Make small balls.
                •  Fry these balls and let children enjoy them as snacks with chutney / sauce.
                •  You can make gravy of your liking and dunk the fried balls to the gravy and presto! Nice vegetable is ready:)
            http://jyotsna-pant.blogspot.com/2012/10/patta-gobhi-kofta.html

            Do not squeeze water from lauki as it is cooling in summers. It will get absorbed in besan.
            • Make milk shake from Lauki:
            Pista-Shake Using bottle gourd
                • Take a very tender Lauki do not peel.
                • Wash it and grate it.
                • Boil the grated Lauki with little milk till cooked.
                • Cool and grind it in a mixer to fine paste.
                • Take 150ml. of milk at room temperature.
                •  Add 4-5 tea spoons of paste of cooked Lauki.
                • Churn in mixer.
                • Add pinch of cardamom powder mix, pour the mixture in a tall glass.
                •  Cool it in fridge for 3-4 hrs.
                •  Top it up with 1 tea spoon of finely cut Pista  (pistachio) and serve it as pista shake to the children.
                • The green color of the peel will ensure it looks green like pista shake.
                •  They will love it and lap it up till they do not see you Making It!!!!
                • You can freeze it and serve as pista ice cream.:)
            • Children love cheese : -
                • so try to make parathas stuffed with cheese.
                •  Uttapa topped with onion, cheese, tomato.
                • Omelets topped with onions, tomatoes, cheese, and some greens.
                • Little cheating with children for their good is not a bad idea so sneak some greens like methi, spinach, coriander.
             This will make sure your child is  hooked to homemade food. Remember occasional pizzas and burger will not harm the child but frequent use is not good for health.
            • Make Sandwiches from whole wheat bread / multi grain bread instead of white bread : -
                •  Use cucumber, onion , tomato, chicken,eggs, cheese and sneak in few shreds of Raw spinach / Salad leaves / Mint / Coriander/ Celery /Parsley.
                •  Using different ingredients and herbs will change the flavor and taste of sandwiches and the child gets complete nutrition.
                • Remember everybody likes change in the taste so surprise your children and entice them to eat homemade delicious, nutritious sandwiches.
            • Noodles are another favorite of children so do not get worked up about their nutrition if they ask for noodles / pasta time and again.
                • Instead just boiling the noodles/ pasta and giving them to the children.
                • Cut cabbage, French beans, Carrot, Onion some peas, shredded chicken and sauté them
                • Add to boiled noodles along with grated cheese, tomato sauce, soy sauce, chili sauce (optional).
            This way child get the food they want along with full nutrition! Child is happy and Mom is also happy.
             MAKE SURE THE VEGETABLES ARE CUT VERY VERY FINE.

            Thursday 6 October 2011

            Neem A Gift from God (Uses of Neem, Indian Lilac)

            Neem with fruits
            Neem tree is great gift of God to mankind. It's uses are vividly mentioned in Ayurveda and naturopathy.With the passage of time, paucity of time and modernization we have started to make less use of it. The essential oil present in Neem leaves give them germicidal, pesticide, anti-fungal insecticidal and many many other medicinal properties. I wish to share few benefits of Neem.

            Neem can be used for:
            • For preserving Clothes from silver fish.
            • Preserving Grains.
            http://housekeepingexpert.blogspot.com/2012/10/preserving-grains-using-neem.html
            • For curing dandruff.
            http://housekeepingexpert.blogspot.com/2012/10/natural-cure-for-dandruff-neem-dandruff.html
            • For curing Lice infection. 
             http://housekeepingexpert.blogspot.com/2012/10/neem-cure-for-lice-and-dandruff-anti.html
            • As germicidal,Pesticide and Insecticide in garden.
            • As mouth wash.
            • As face pack for glowing skin
            • For curing prickly heat and other skin infections. 
            For The Garden : -
            • Pluck 50 - 60 Neem leaves , make a paste of them and add to a bucket full of water.
            • Cover the bucket and keep it over night to mulch.
            • Pass the mixture through a fine sieve . 
            • Take the liquid in a sprayer and spray on the plants .
            • Your plants and trees will not be afflicted with pests and if any fungal infection has come onthe plants and trees it will get cured
            • Do not spray the Neem solution while the trees are just about to fruit.
            • The best time to spray is when the fruiting season is about to start.(before the flowers of the tree have appeared). 
            • Take the mulched solid collected on the sieve and mix it with soil of your garden/pots for potted plants.This will a natural manure as well as pesticide for the soil and will not harm the beneficial bacterias and worms ( earthworm which is very useful for the soil).
            For Face Pack : -
            • Puck tender Neem leaves Grind them to thick paste.
            • Add a pinch of Turmeric powder,1/2 tea spoon of lemon juice, and 1 tea spoon of Besan(black gram powder).
            • Mix nicely and apply to the face, neck and hands.
            • Leave for 15 min.
            • Remove using wet soft cloth and then wash the face, neck and hands with warm water.
            • Do not use soap or any face wash that day,at least for 5-6 hrs.
            • Using this face pack once in every 15 days will give you a glowing soft skin as it acts as defoliator, cures acnes, cures the tendency to have acne , pimples and boils.
            • Use and see the change. Compliments from one and all will follow.
            Neem as Mouth wash and protector of Teeth from decaying: -
            • Those who suffer from foul breath and have to use mouth freshener every now or then or suck on mint again and again to get rid of the foul smell, Neem leaves are very good.
            • Take 
              • 4-5 Neem leaves and 
              • 10-12 mint leaves.
              • 1 Teaspoon coriander seeds,
              • 2-3 cm. Cinnamon piece
              • Grated rind of one lemon
              • 200 ml. Water
            • Boil till the water reduces to half.
            • Cool and filter.
            • Use this extract to rinse your mouth early in the morning and before going to bed.
            • After a months foul smell will be gone for good!
            • The water will taste bitter, then pills which cure are bitter , some times sugar coated.

            Monday 26 September 2011

            Dry Cleaning(How to dry clean delicate clothes at home)

            Cardigans Dry-Cleaned at Home
            Sari and Blouse After Dry-Cleaning
            While staying in cantonment area campus has its own privilege there are some short fall also. The biggest being they are far away from the city, thus it becomes painful and time consuming to go to city for every small thing. The need of dry cleaning is one amongst them. I having chemistry back ground came up with this indigenous method of dry cleaning which not only saved me time and money but also earned me appreciation and gratitude from all the ladies in the campus who learned from me. Now where ever I am I do not worry about the stain on my sari or my husband suit!
             Preparation Time: 10 minutes
            Dry Cleaning Time: 30-40 minutes
            Cloths Dry-cleaned: 6 (1 stole,2 Saris,2 Cardigans)

            Materials Required For Dry-Cleaning:
            • Three buckets half filled with water
            •  500  ml. of petrol
            • 1 table spoon of good quality detergent
            • 2 tea cups White vinegar
            Directions for Preparing the Buckets:
            Uncleaned Sari with Fall and lower portion dirty
            • Keep all three buckets in line. (Referring the first bucket to as bucket no.1 , second bucket to as bucket no. 2, and third bucket as bucket no. 3)
            • Add the following to bucket no.1 and keep aside:
              • Detergent
              • 1 cup petrol ( approx. 150 ml.)
              • 1 cup vinegar
            Petrol being Added to water
            Vinegar being added To petrol water mixture
            Detergent being Added to water with Petrol and Vinegar
            •  To bucket no.2 add the following and mix thoroughly :
              • Remaining vinegar
              • 150 ml. approx. petrol
            Second Bucket is being Readied for Dry-cleaning
            • To bucket no. 3 add remaining petrol approx. 150- 200 ml. and mix thoroughly.
            Petrol Being Added in Third Bucket
            Step 1:
            • Take the dress/cloth which is to be dry cleaned and put it in bucket no. 1 after mixing it's content nicely.
            Sari being cleaned
            Cardigan washing
            • If the cloth is multicolored then wash the light color side first then the dark color side.
            • Dip the cloth in the bucket and give it a gentle rub, do not scrub with brush as it may harm the delicate cloth.
            • Let it be in the bucket for 5 min. 
            Step 2:
            • Take it out and squeeze it by pressing between palms, never wring the cloth.
            • All dirt and stains will be removed and the water will become very dirty after washing 5-6 medium size/2-3 large size clothes. I washed 2 cardigans, one stole and two saris before the water in the first bucket was rendered useless.
            All Dirt in Water Of Bucket No. 1
            • Put it in bucket no. 2. and give the cloth nice soaking and swirling. This is to remove excess of soap and the adhering dirty water from the clothes.
            After cleaning in Bucket No. 2
            Dipping in Bucket No.2
            • Let it be in the bucket for 5 min. 
            Step 3:
            • Take out squeeze and put in the bucket no. 3 .
            • Take the cloth out and in continuously  in the bucket and give 2-3 swirls to ensure all dirty water and detergent if any is removed. The petrol in the last bucket ensures shine and faster drying of clothes.
            • All dirt and excess detergent removed and the Sari is cleaned
            • Take out the cloth and squeeze it nicely.
            Squeezing for removal of water
            Dry-cleaned Cardigan being squeezed for removal of excess water
            • Semi dry the sari by holding all ends and then folding it and drying it under shade or let the excess water drip while drying, only this will take more time.
            Correct way to dry Cardigans
            Saris being dried
            Step 4:
            • Give a mild ironing before it dries completely .
            • When dry iron it and your cloth is dry cleaned.
            Cloths Dry-Cleaned at Home
            Sari with Jari work and Stole After Dry-cleaning
              Tips:
            • Use good quality detergent harsh detergents are detrimental to the delicate fabric and its color. 
            • For starters,  a word of caution:  first dry clean single colored cloth. Once adept then you can try double colored and multicolored cloth.
            • If the clothes are small then 8-10 clothes can be dry cleaned in the above said material only take care that light colored are to be washed before dark, and darkest are washed the last.
            • If there are stains then gently scrub the stains when the cloth is in the first bucket.
            • Never hang woolens in a hanger or cloth line, they will loose their shape and size permanently, dry them on ground on a clean white bed sheet.
            • Once you become adept then Jari Saris, Jackets, Suit, all can be dry cleaned at home. 
            • Clothes washed by above method retain their shine and shape perfectly for a long time. 
            • To learn this, first try this on Old clothes before you dry wash new clothes. 
            • White or light colored clothes should be cleaned first followed with darker ones. Black in the last.
            • Do not let the dry-cleaned clots dry completely ironing will become comparatively difficult. The marks formed due to squeezing will require more ironing . Damp cloths get ironed fast.