Wednesday, 23 October 2013

How to Keep Chopping Board Clean and White

Chopping Board After Cleaning
Chopping Board before Cleaning
Chopping board become dirty very fast due to the scratches it gets from knife. The scratches get filled with the juices of vegetables and gather dust and daily regular way of cleaning does not help to larger extent. So if not cleaned properly from time to time it not only looks repulsive but is also unhygienic. Thus it is imperative to clean the dirty board properly. Here is the simple way of maintaining the chopping board neat and clean. This process should be done once a month so that the board remains clean, hygienic and looks as if new.
Time Taken To Clean One Board: 15min. (Soaking time not included)

Materials Required For Cleaning Chopping Board:
  • 2 Teaspoons Surf or any washing powder
  • 2 Teaspoon Vanish
  • Water
Directions For Cleaning The Dirty Chopping Board:
Dirty Chopping Board
  • Wash the dirty board with water.
  • Mix the washing powder and vanish powder.
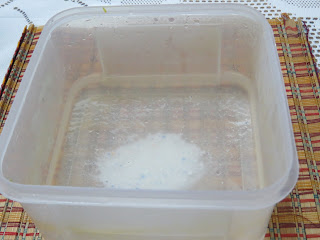
  • Sprinkle 2 teaspoon of this mixture on the board and allow to rest for 2-3 hours.
Washing Powder Mixture Spread On Chopping Board
  • After 2-3 hours the cleaning powder mixture along with the water will have acted on the dirt in the crevices and scratched formed by knife.
  • Take a brush and scrub without allowing the soapy mixture to fall away.
  • The soapy mixture will look dirty brown as it had gathered the dirty with it.
Scrubbed with Brush After Resting For 2 hours
  • Let it rest for 20-30- minutes more.
  • With a scrub, scrub the board nicely. All dirt will come out in soapy mixture.
  • Wash with flowing water.
  • If the board is too dirty and looking brown rather than white then repeat the process twice. You will get a board as if brand new.
Chopping Board After Cleaning
  • Clean the other side of the board the same way.
  • Enjoy chopping on clean hygienic board. Repeat this process at least once a month.
Tips:
  • Avoid using iron scrub.
  • Longer you allow the board to soak the soapy mixture better it is. I let it stand overnight and in the morning wet it with water and then scrub.
Alternate Suggestions:
  • Liquid vanish or bleaching powder/liquid can be used instead of vanish powder.

Thursday, 17 October 2013

How to Clean Dosa Tawa (How to Clean The Iron Plate For Making Pancake)


Dosa Tawa before Cleaning Process
Dosa Tawa After Process of Cleaning

It is really irritating that when we want to make dosa, Uttapa, Chile or Pesarattu it refuses to leave the hot seat and gets stuck to it. I have had that experience whenever I have made the mistake of leaving my non-stick tawa or the tawa on which I make dosa to my maids. The problem of cleaning comes because they have to be handled with utmost care so that the surface does not get scratched. I think this problem is faced by most of us, so to unveil the mystery of bringing the dosa tawa to its old glory I am posting this article with the hope that it will be beneficial to all of those who look at the spoiled tawa with dismay.

Time for Cleaning: 15 minutes   

Material Required For Cleaning Dosa Tawa:

  • 1Piece of Onion
  • 1/2Lemon
  • 2 Teaspoon any cooking oil
  • Water
Directions For Cleaning Dosa Tawa:


Dosa Tawa With Cooked Dosa Stuck to it
Dosa Made on Sticky Tawa

  • On the Tawa put 10-15 ml. water and 5-6 drops of oil and 5-6 drops of lemon juice.
  • Heat Tawa with water and oil mixture on low flame till it boils.
  • Remove from heat and let the tawa cool.
  • Throw away the water oil mixture. Repeat the process two or three times.
  • With a clean piece of cloth wipe the tawa clean. Try masking dosa. If the cooked dosa is yet sticking then do not scratch the stuck material but repeat the above said process again till the tawa is clean of all material stuck to it.
  • Cut the onion to half and pour 1ml (8-10 drops) oil on the tawa and heat it.
  • When the tawa is moderately hot remove from heat and scrub it with onion.
  • The oil will spread all over the tawa. Keep scrubbing with onion piece for 2-3 min.
  • Let the tawa cool.
  • Wash with fresh water.
  • Heat the tawa and scrub it with oil and onion piece and make dosa. 
Dosa Tawa After Process of Cleaning

  • Dosa should come clean off the tawa.
  • In case it gets stuck at any point do not remove it forcefully but gently remove the dosa and let the materiasl stuck to it remain as it is. Heat tawa with oil-water mixture. 
Uttapa Come Almost Clean Except At One Small Spot

  • Wipe clean with soft cloth after draining the water from tawa.
  • Scrub with oil and onion piece and make Dosa happily. It will come out clean off from hot seat making you feel winner.
Crisp Dosa After Cleaning Process

  • After making dosa let the tawa cool and come to room temperature. Wash it with fresh water and wipe it clean with soft cloth. This will make sure the thin layer of oil is maintained on the tawa.
Tips:

  • Never use harsh soap/scrub or iron spatula/scrub to clean the dosa tawa. Scratches formed will cause the dosa or chilade to get stuck to tawa.
  • Never wash hot tawa as the top layer of tawa gets spoiled.
  • Do not make roti/chapatti on dosa tawa the dry flour on the chapatti used during rolling the chapati will cause the top layer of tawa to become rough and cause dosa to get stuck to it.
  • Onions have become expensive in India so do not waste it while cutting onion for vegetable the top which normally is cut off and discarded can be used it will be easy to grab the piece from the top as it has dry leaf bunch.
  • After squeezing the juice from lemon, do not throw them. Store them in deep freeze of fridge and soak in water 5-10 min before using.
  • Always scrub the dosa tawa with onion and oil right in the starting whenever you are making dosa this will increase the life of your dosa tawa. I do it before making each dosa this makes the dosa golden brown with least oil, Dosa/chilade does not get stuck to tawa and saves my tawa also.
Alternative suggestions:

  • After cleaning the tawa if it is stubborn and yet is clinging to the dosa then instead of repeating the process again and again make omelet two three times and each time wash with hot water to let the smell of egg go away. Do not use soap or any cleaning liquid. 

Monday, 6 May 2013

How to clean Studded Jewelry


Diamond Jewelry Cleaned At Home With eating Soda-Water Mixture
Jewelry especially studded jewelry collects dust and dirt and lose their shine. The sparkle of diamond and gems is because of the refraction of light. In more simple terms when light passes through the diamond then it sparkles. If dirt collects at the inner part if the jewelry or the edges of diamond or any gem then the refraction becomes less and the sparkle reduces. The rate of jewelry collecting dirt may differ depending upon the life style of the person wearing it, but certainly cannot be avoided. Also it is very tiresome and time taking to go to jeweler to get it cleaned. Cleaning the studded jewelry at home requires little effort, saves time and money. I clean my diamond jewelry once in a month as kitchen work causes the rings to collect dirt fast what so ever precaution I may take.

Cleaning Time : 60 min.
Cleans 6-10 small jewelry items or two big jewelry items.

Materials Required For Cleaning The Diamond Or Any Other Studded Jewelry:
  • 1 Tea spoon eating Soda
  • 1 Baby Tooth Brush
  • Soft cloth
  • 1 Bowl
  • Water
Directions For Cleaning The Studded Jewelry:
  • Take 100ml. water in a bowl and add eating soda in it.
  • Put the jewelry to be cleaned in the eating soda water mixture.
jewelry with dirt on it
Jewelry in Eating Soda and Water mixture
  • Allow the eating soda to dissolve slowly and release carbon di-oxide slowly.
Bubbles of Carbon di-oxide are forming slowly and loosening up the dirt
  • The collected dirt in the crevices will swell after soaking water and the carbon di-oxide will push it out.
  • Any dirt which must been sticking to the surface will also react with water and carbon di-oxide mixture (Carbonic acid) and dissolve, thus making the surface of gem as well as metal shining. 
Jewelry after soaking for 30 minutes
Dirt from the jewelry loosening up after soaking for 30 min
  • Gold, silver platinum and white gold (Any precious metal for jewelry) are noble metals and do not get adversely effected by carbonic acid which is form instantaneously by carbon di-oxide dissolving in water and is extremely week acid.
  • Let the jewelry soak in soda water mixture for at least 30-40 minutes.
  • Most of the dirt have already fallen in the eating soda-water mixture.
  • Take a baby brush and slowly remove the loose swollen dirt from the jewelry.
  • Wash two or three times with fresh water.
  • Dry with soft cloth.
  • Sparkle will be back in your jewelry.
Jewelry Cleaned with Eating Soda-water Mixture

Tips:
  • Do not use used brush / or tooth brush meant for grownups because the bristles will be comparatively hard and may damage the jewelry.
  • Do not use ear bud as the cotton from ear bud may get stuck between gem and the metal and will spoil the look of jewelry also it will become difficult to remove the cotton fiber stuck with the jewelry.
  • Never use any blunt or sharp edge object to pry the dirt from the gem, metal or crevices of jewelry as it will cause scratches on the jewelry and spoil it.
  • In case the jewelry has not been cleaned for a long time then soak the jewelry for 60-90 minutes.
  • One tea spoon eating soda is sufficient for 4-5 rings/ ear rings / ear tops/ two studded bangles.

Friday, 18 January 2013

How to remove dirt from the crevices of lids of containers


The most convenient containers are the one which are air tight micro wave containers as they can be of multiple uses. For school kids they are the best for packing lunch. But the biggest problem faced is how to clean the dirt which gets accumulated with the passage of time and gets hardened due to heating in micro wave. My daughter in-law one day was at her wits end to get the crevices of lids cleaned . I told her do not worry it is easy only next time do not wait so long that the lining of lid starts becoming black, I can get the dirt out of the crevices but certain amount of black marks will remain as they are the discoloration of the material caused by accumulating dirt and it will not cause any health hazard. She was surprised that cleaning the lid crevices could be so easy and effective. She has made it a point that once in a week all lids are cleaned by the method I explained and is now happy with the outcome.  

Soaking Time: 2-3 hrs
Cleaning Time: 15min
Cleans 4-5 lids

Materials Required for cleaning The lid Crevices:
  • 500ml.water
  • 2 Tea spoon Detergent
  • 3-4 Ear buds
  • Water was final wash
Directions for Cleaning the Lid Crevices:

Lid with dirt in the crevices
  • Take 500ml. water in a container and heat it to lukewarm state.
  •  Add 2 tea spoon detergents to it.

Water with detergent

  • Dissolve the detergent in hot water.
  • Soak the lid with dirty crevices in the detergent solution for 2-3 hrs. 

Dirty lid kept in detergent water for dirt absorbing water and swelling up
  • The dry dirt will soak detergent solution and swell up.
  • Remove the lid from detergent solution and roll a cotton ear bud in the crevices of the lid applying little pressure.

Clean ear bud and the dirty lid soaked for 1 hr.
Ear bud collects the dirt and also forces the dirt out of the crevices
  • The cotton of the ear bud will collect the dirt a force it out of the crevices.
Dirt being removed by ear bud
  • Repeat the process of rolling the ear buds in the crevices till they come out clean.
  • Wash the lid in flowing water and roll a clean ear bud through the crevices while washing under flowing water.
Lid after cleaning with ear bud
  • Clean lid is ready to be put on the container.

Lid after dirt has been removed from the crevices
Ear bud with some of the dirt
Tips:
  • Increase the water amount for more.
  • If the dirt has been accumulating for very long time then increase the soaking amount to 6-8 hours.
  • Do not rub the ear bud to  harshly for it will cause aberration in the material of the lid crevices.
  • If you do not have ear but simply roll some cotton or cotton cloth strip on a tooth pick and use it to remove the dirt.
  • Do not use very hot water as it may spoil the lid.
Suggested Variations:
  • In a house hold small pieces of soap are always wasted as they cannot be used for bathing/washing cloths they can be used instead of detergent.